Thanks to technology I found the class. Where would we be without the internet? Still looking things up in the phone book, I guess. So back over the summer I just Googled something like, "sewing classes in Houston" and found this place called Sew Houston. Yolanda responded to my email and list of questions. She seemed so nice and as luck would have it, an introduction class was happening soon.
I took that class and a few more. Now I feel like I am pretty "crafty" when it comes to sewing. I have practiced A LOT!
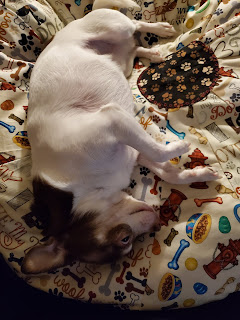
My friend, Janet, decided to embark on this adventure with me! A floor pillow pouf.... AKA Gizmo's new napping pillow!
IT WAS SO MUCH FUN! I can't wait til CHRISTMAS BREAK and I plan to make another one.... maybe more! :)
You need:
3 fabrics (1/2 of each)
1 yard (this will be the bottom)
stuffing/filler - bought mine at Walmart
At the class, she provides the machine, thread, tools, etc.
So to get started:
1. Lay out the THREE fabrics. (Put the bottom one to the side.)
2. Trace the pattern, 5 times (which will make 15 of these special triangles)
3. Cut them out.
4. Put them in the order that you want.
5. Sew them together.
Right sides together for the first two. Then open it. Lay the third piece facing down so it is RST on the second piece.
6. Repeat until done.
7. Sew the last one to the first one so that it makes a circle.
You can use scrap material from the triangles (that is what Janet did) or use a corner from the bottom fabric. (That is what I did.)
(You can use Steam a Sew or Wonder Under to adhere it so that it won't move. Read directions on that package when using those.) You cut it, iron it on, peel off backing, and then stick it to the fabric and iron.... I THINK. Not sure. We had help with this step. When doing it again, I will read the directions to the product, so that we apply it correctly.
9. Use a decorative top stitch to sew on the top.
10. Lay the top piece RST on top of the one yard of fabric. Pin in each triangle to hold in place. Cut a circle around the top. (The bottom fabric was turned over after the picture was taken. It needs to be RST! I keep saying RST so that I don't forget!)
9. NOW SEW around in a circle and stitch it together (1/2 inch sem allowance). LEAVE ONE TRIANGLE OPEN - so you can fill it later.
10. Turn entire pillow RIGHT SIDE OUT.
11. Stuff it or put the filler in the pillow. (Bought my box of filler at Walmart.com)
12. Sew closed. Stay right close to the end. I didn't want to attempt this. Yolanda helped us!
DONE!!
TAKE HOME TO GIZMO! (of whomever)


No comments:
Post a Comment