Sunday, March 15, 2020

Sewing Extension Table No Tech Needed

My newest hobby is sewing.  I have watched numerous videos on different things.  The more I watch and learn, the more I realize that I needed a sewing machine extension table.  WOW!  The prices!  I decided why not try to make one!  GIRL POWER!

TWO TOOLS:
Jig Saw (yes you can use one - this was my first time)
Screwdriver (I used cordless, but a regular one will work)

THREE ITEMS:
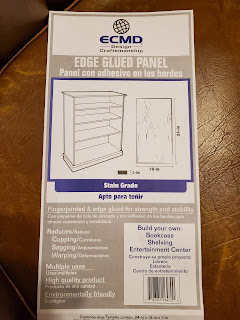
board (see the picture below - it is a shelf board from Lowe's)
"A" hardware (Make sure you get A!)
bun feet (You need four of them.)

Plus optional items (keep reading)


OPTIONAL:
Paint (I used purple!  You can use other colors, but I don't know why you would.  PURPLE IS THE BEST).
*white paint as a base (made the purple show up better)
Valspar crystal sparkles - because glitter makes everything better

ALL items purchased at Lowe's.


INSTRUCTIONS:
Measure and cut the board so that your machine will fit right into the board.  I had to decide how much space I wanted in the front and the back of the machine.  I used a pencil and drew a line.  I carefully used the jigsaw to cut on the line.  (Watch You Tube videos if you are new at this.)


Then measure about two inches in for the feet hardware.  I measured about two inches in for balance.  I just made sure they were the same distance on each side.


The "A" style hardware are STRAIGHT.  Make sure to notice this because there are other types and you might buy the wrong ones.  I tried to put them in the same spot on each corner.  I placed one to see what I thought looked good, then measured it, so the other ones would match.  Don't over complicate this.  Just put them on there! :)

The screws were easy to do because the wood isn't like a regular board.

Attach the feet.


Paint.... if you prefer.  I put about 4 coats of paint because it soaks up the paint fast!  I painted the underneath and I painted the feet!


Only add the paint when you are ready to paint it.  It will show up in the paint when it dries.  Of course I used the whole package in one can of the "sample" sized paint.  I prefer LOTS of glitter!  I waited a couple hours in between the coats of paint.  I did it outside in the heat, so that it would dry fast! (After it sits a few days, the glitter dissolves, so be sure to paint it right away.)


ENJOY YOUR NEW TABLE!!

P.S. 
I used 2 part epoxy (and glitter) to give it an extra smooth finish.  Then waited several days for it to cure.  Lastly, added another thin layer of 2 part epoxy.  It has a very smooth finish and you can see the beautiful glitter as well!  

IT WAS A SUPER FUN PROJECT!  

Tuesday, November 26, 2019

Technology Tip Tuesday - Changing the Settings in Google Docs

Changing my default settings in GOOGLE DOCS.....

I have wanted to do this for a while.  I have tried, but it didn't seem to work.  Well I found a post and read it all the way to STEP 9... and it worked!

You have to go to 
FORMAT
PARAGRAPH STYLES
OPTIONS (which is at the bottom)
SAVE AS MY DEFAULT SETTINGS

Here is the website.....


Monday, November 18, 2019

Technology Makes Everything Better - Scarves For My Class

When I first starting making scarves for my kindergarten classes, I used gold glitter paint.  Now that I have a Cricut, I use it to cut their names.  Technology is great!  It makes the scarves look so much better!

Start with the blanket from Walmart.


You need to unfold carefully - it will be folded in thirds - which helps because you are wanting to make 6 scarves out of one blanket. 

I used my quilting ruler and rotary cutter to make a straight line.  Also cut off the edges because they have a thread that hemmed it.  (You can use scissors or sheers to cut them.)


Now cut the ends, make slits.  I didn't measure and it doesn't matter if they are straight.  You are going to knot them.


Now you do the knots.


I had previously created and cut the names with glitter HTV with my Cricut.  If you don't have one, then you can use glitter fabric paint for the names.


Finally, I used the Cricut HeatPress for the names.  Set it on 315 degrees for 10 seconds.


DONE!


So now you have a great Christmas gift for each student in your class.  It only takes about 2 hours to make a class set of about 20 students.   Do the math... it is about 42 cents a piece each.  

THE KIDS WILL LOVE THEM!  I have made these for many years now!

Just a hint:
It is more fun and less stress to do it in stages.

Create the names and cut them one day.
Cut the blankets another day.
Then sit down with a good movie and cut the ends and tie the knots.  
Iron all at one time.

ALL DONE!!


Saturday, November 16, 2019

How to Make A Floor Pillow AKA Dog Pillow

I now love to sew.  Thanks to technology and the advancements that have taken place over the last 50 plus years, I now own a sewing machine.  Well of course I have my mom's old sewing machine just because it was hers.  I kept it because I remember her using it even though she didn't like to sew.  If she were with us now, I think she would like the new type of machine where it it digital and is very "smart". 

Thanks to technology I found the class.  Where would we be without the internet?  Still looking things up in the phone book, I guess.  So back over the summer I just Googled something like, "sewing classes in Houston" and found this place called Sew Houston.  Yolanda responded to my email and list of questions.  She seemed so nice and as luck would have it, an introduction class was happening soon.

I took that class and a few more.  Now I feel like I am pretty "crafty" when it comes to sewing.  I have practiced A LOT!

My friend, Janet, decided to embark on this adventure with me!  A floor pillow pouf.... AKA Gizmo's new napping pillow!

IT WAS SO MUCH FUN!  I can't wait til CHRISTMAS BREAK and I plan to make another one.... maybe more! :)

You need:
3 fabrics (1/2 of each)
1 yard (this will be the bottom)
stuffing/filler - bought mine at Walmart

At the class, she provides the machine, thread, tools, etc.

So to get started:
1. Lay out the THREE fabrics.  (Put the bottom one to the side.)
2. Trace the pattern, 5 times (which will make 15 of these special triangles)
3. Cut them out.


4. Put them in the order that you want.


5. Sew them together.

Right sides together for the first two.  Then open it.  Lay the third piece facing down so it is RST on the second piece.

6. Repeat until done.

7. Sew the last one to the first one so that it makes a circle.


8. Then use a circle, any circle for a pattern that will be big enough to cover the center.
You can use scrap material from the triangles (that is what Janet did) or use a corner from the bottom fabric.  (That is what I did.)

(You can use Steam a Sew or Wonder Under to adhere it so that it won't move. Read directions on that package when using those.)  You cut it, iron it on, peel off backing, and then stick it to the fabric and iron.... I THINK.  Not sure.  We had help with this step.  When doing it again, I will read the directions to the product, so that we apply it correctly.


9.  Use a decorative top stitch to sew on the top. 


10.  Lay the top piece RST on top of the one yard of fabric.  Pin in each triangle to hold in place.  Cut a circle around the top.  (The bottom fabric was turned over after the picture was taken.  It needs to be RST!  I keep saying RST so that I don't forget!)


9.  NOW SEW around in a circle and stitch it together (1/2 inch sem allowance).  LEAVE ONE TRIANGLE OPEN - so you can fill it later.

10.  Turn entire pillow RIGHT SIDE OUT.


11. Stuff it or put the filler in the pillow.  (Bought my box of filler at Walmart.com)


12. Sew closed.  Stay right close to the end.  I didn't want to attempt this.  Yolanda helped us!


DONE!!


TAKE HOME TO GIZMO! (of whomever)


Sunday, November 10, 2019

TEACHERS NEED A BREAK: How to Make an Oven Dress

I am thankful for the technology we have these days! I remember my mom being so upset over her old sewing machine and how much trouble it gave her. 

Technology has come a LONG way over the past 40 years.  Once I saw how "new and improved" sewing machines had become, I decided that I would give sewing a try.  Over the last few months I have made several things.  It has become my latest hobby. 

I need a stress reliever with all the requirements of my teaching job and being in grad school.  Sewing is fun, relaxing, and productive. 

Here is how I make the oven dress:

1. Cut out 4 of the pattern.  TWO are from a pretty (outside) pattern and TWO are from a plain (inside) pattern.


2. RST - Right Sides Together
One of the pretty and on plain.  Do that for both.


3.  Sew the NECK and the outside edges together.  Do not sew the two straight top lines or the bottom.  (The tops will be connected together later and the bottom is where the towel will be later.)


Don't go all the way to the end, so that you can turn it under and it will make a nice hem.


4. Clip the neck and on the sides where it curves, so that when you turn it right side out, it will look smooth.

5. Iron the bottom edges.

6. Turn right side out and iron flat.


7. Put two completed pieces together to attach the tops.  RST (Right Sides Together) and sew each of the lines.  Be sure to back stitch when you stop and start.


8. Flip over and admire your work. :)

9.  Insert the towel on each end.  I like to use basting spray so that it stays in place. 
You can use a decorative stitch since the thread will be noticed here.


DONE! Hang on your oven or towel rack.  Use it daily! :)


Sunday, August 11, 2019

HOW TO MAKE A QUILT OR How I Made a Memory Quilt


NOW.......
If you want to make a quilt, first pick out what shirts you want to use.  Are you going to use the front, back, or both?  (Several years ago my daddy and I started a box of shirts.  I am glad he helped pick them out.)

1. Cut the shirts.  Yes be brave and cut them.  It was difficult, but I did it.  If I can do it, you can do it.  You need a shirt square and a NEW blade on the rotary cutter.  This is what it looks like.  In addition to my daddy's shirt, I had a t-shirt made at Vista Print with photos on it.  The photo shirt was just the right size.  It fit perfectly on the grid.  


(This took about an hour to get them all done.) 

2. Put fusible stabilizer on them.  This is called Pellon.  It is Pellon 911FF.  Here is the link to find it at Joann's.


3. Lay out the quilt the way you want it.  This might take a while especially if you are OCD about colors touching etc.


(I numbered mine. I use my Cricut!  I love that machine!  It wrote the numbers and then cut out the squares.  I used a straight pen and numbered mine so that I wouldn't mess them up when attaching them.  Also, I would be taking them to the class the next day and didn't want anything to go wrong.)

SIDE NOTE:
My quilt is a little bigger than the normal one the one you make in the class.  The size you make in class is 4x5, and mine is 5x6.  The wonderful teacher understood that this was my dad's shirts and I wanted to use many as possible.  Also this size will lay nicely on my king sized bed for displaying purposes.

I had to make my back at home for "homework", which is why I bought a sewing machine (Janome DC2019) ...... or at least that is my excuse.  WAIT!  I am a big girl paying my own bills, so I don't have to make excuses.... I bought a machine, because I wanted to.... and Gizmo agreed it was a good idea to make the purchase.  LOL

 It took me about 45 minutes to piece it together.  The blanket with the photos wasn't exactly the right size that it was supposed to be.  (I ordered it about a year ago and was just displaying it.)  It was supposed to be 34 inches wide.  I had to measure it and remeasure it to make sure that it was exactly 34 inches so that the purple border would be exactly the right size.

It did take a little bit of math to figure out how to piece this all together.  It is two long sides on the left and right and then two short ones at the top.


LOOK CLOSELY at that picture.  Gizmo is sitting on the blanket - on a photo of himself.  I am glad I timed that just right because it make him look 3D.  

4. Sew each square together, horizontally to make rows.  I did all this at home too.  It was so fun, I didn't want to stop.  It didn't take that long!


5. THEN.......I had to spread out all the rows in class. 
Attach the rows - that gets tricky.  Pay attention to what you are doing or you could get them in the wrong order (mainly because you have to put RIGHT SIDES TOGETHER when sewing.)


6. Now the backing - that is the heavy part.  RIGHT SIDES TOGETHER!  
(I had to piece mine together because the Minky wasn't wide enough and I wanted to use a blanket that I have had for about a year.  See pic from earlier.)
Take your time.
Be sure to leave part of one side NOT DONE, so that you can flip it right side out.  (You can clip the corners, but I didn't this time.)

7.  NOW...........Turn it right side out.  

8. Hand sew the edge or use the machine.  You can make another stick all the way around if you prefer. (The instructor did the hand sewing for me. By this time, I was overwhelmed with emotions.  I couldn't do it.  I was really wishing that my daddy could have been here to see this.  I know that he would be so excited, I can see him smiling and telling me how much he loves it.  He would have even gone to class with me.  He was my best friend and I miss him dearly.  Gizmo misses him too!  He looks for him sometimes.)


9. TAKE IT HOME AND LOVE IT!  
Gizmo has claimed it as his!  LOL  It is super soft on the back and that is his favorite.  


You need to take the class from Sew Houston (https://sewhouston.com/) so that you can learn tips and tricks! Yolanda is a great teacher!  She is patient, understanding, and very sweet! (She taught school before she started the sewing school!)  GO SEE HER!  You will be happy that you did!!

If you make yourself or anyone a quilt, please post pictures.  I would love to see them!!

Sewing Extension Table No Tech Needed

My newest hobby is sewing.  I have watched numerous videos on different things.  The more I watch and learn, the more I realize that I neede...